

A practical FortiGate PPPoE guide covering WAN setup, routing, DNS validation and common troubleshooting for business internet connections.
ශ්රී ලංකාවේ මෙන්ම ලෝකයේ බොහෝ රටවල Internet Service Providers (ISPs) විසින් Broadband Internet සේවාව ලබාදීම සඳහා PPPoE (Point-to-Point Protocol over Ethernet) තාක්ෂණය බහුලව භාවිතා කරයි. ශ්රී ලංකාවේ SLT-MOBITEL, Dialog, Hutch වැනි ISP ආයතන Fiber Broadband සේවාවන් සඳහා PPPoE භාවිතා කරන අවස්ථා බහුලව දක්නට ලැබේ.
සාමාන්යයෙන් ISP එකක් Fiber Connection එකක් ලබාදෙන විට, පාරිභෝගිකයාගේ ස්ථානයේ Customer Premises Equipment (CPE) ලෙස හඳුන්වන උපකරණයක් ස්ථාපනය කරයි. බොහෝවිට මෙය ONT (Optical Network Terminal) එකක් හෝ Huawei, Nokia, ZTE වැනි නිෂ්පාදකයන්ගේ Router එකක් වේ. මෙම උපකරණය PPPoE Client එකක් ලෙස ක්රියා කරමින් ISP විසින් ලබාදෙන Username සහ Password භාවිතයෙන් Authentication සිදු කර Internet Connection එක ස්ථාපිත කරයි.
අනෙක් අතට, Leased Line හෝ Dedicated Internet Access (DIA) සේවාවන් සඳහා සාමාන්යයෙන් PPPoE භාවිතා නොවේ. එවැනි සේවාවලදී ISP විසින් Static IP Address එකක් සහිත Direct Ethernet Connection එකක් ලබාදෙන අතර Username සහ Password මගින් Authentication කිරීම අවශ්ය නොවේ.
ISP ආයතන PPPoE භාවිතා කරන්නේ ඇයි?
PPPoE මඟින් Ethernet ජාලයක් මත PPP Protocol එකේ වාසි සියල්ලම ලබාගත හැකිය. එම නිසා ISP ආයතනවලට පාරිභෝගික සම්බන්ධතා පහසුවෙන් කළමනාකරණය කළ හැක.
PPPoE භාවිතා කිරීමේ ප්රධාන වාසි කිහිපයක් පහත දැක්වේ.
✅ Username සහ Password මඟින් ආරක්ෂිත Authentication
✅ ස්වයංක්රීයව IP Address ලබාදීම
✅ Customer Session Management
✅ Internet Usage Tracking
✅ Billing සහ Customer Accounting පහසු කිරීම
සාමාන්යයෙන් ISP විසින් ලබාදෙන ONT හෝ Router එකම PPPoE Client එක ලෙස ක්රියා කරයි. නමුත් Enterprise Networks, Business Connections හෝ Advanced Network Deployments වලදී ISP Router එක Bridge Mode එකට පත් කර, FortiGate Firewall එකේම WAN Interface එක PPPoE Client ලෙස Configure කරන අවස්ථාද ඇත. එවිට Internet Connection එක Establish කිරීමේ වගකීම FortiGate Firewall එකට පැවරේ.
මෙම ලිපිය තුළ අපි Cisco Router එකක් PPPoE Server ලෙසත්, FortiGate Firewall එක PPPoE Client ලෙසත් Configure කරමින්, PPPoE Connection එක Step-by-Step ආකාරයෙන් සකස් කරන ආකාරය ප්රායෝගිකව ඉගෙන ගනිමු. මෙම Lab එක හරහා PPPoE ක්රියා කරන ආකාරය මෙන්ම FortiGate සහ Cisco Platform දෙකෙහි Configuration ක්රියාවලියද හොඳින් අවබෝධ කරගත හැකි වේ.
Lab Topology
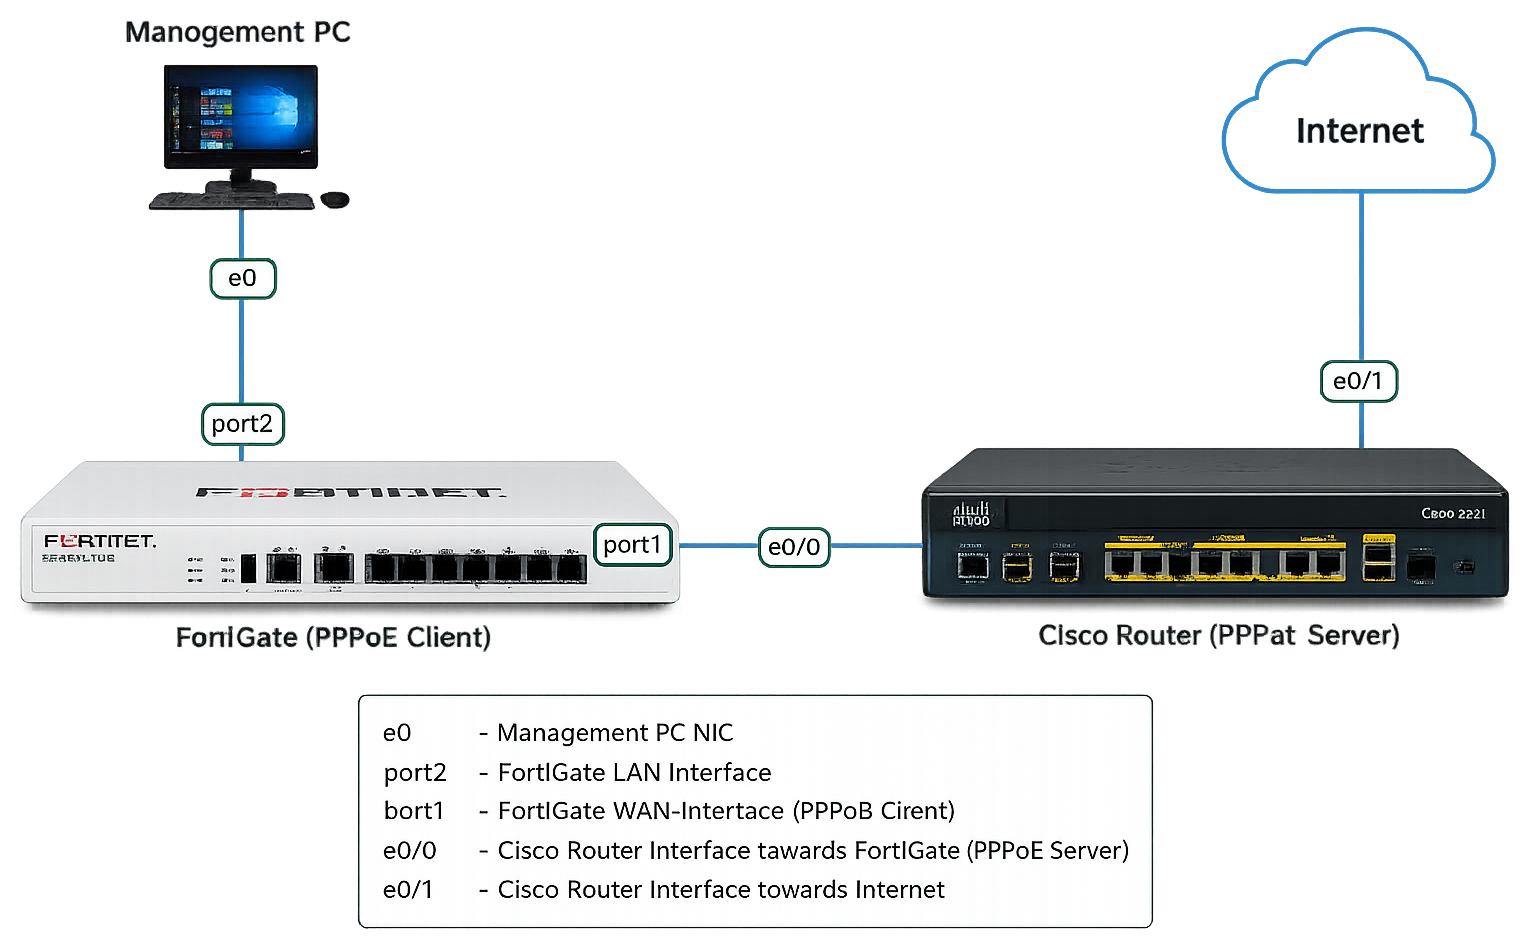
පහත Diagram එකේ topology එක භාවිතා කරලා මේ lab එක configure කරනවා.
- Cisco Router (R1) - PPPoE Server
- FortiGate Firewall - PPPoE Client
- Management PC - FortiGate Management සඳහා
- Internet / Cloud - WAN Network
Step 01 - Cisco Router PPPoE Server Configuration8
PPPoE Server එක configure කිරීමේදී පියවර කිහිපයක් තිබෙනවා.
1. BBA Group එක Create කිරීම
මුලින්ම PPPoE sessions manage කරන්න BBA Group එකක් configure කරන්න.
Server(config)# bba-group pppoe global
Server(config-bba-group)# virtual-template 1
මෙහි Virtual Template 1 භාවිතා කරන බව Cisco Router එකට කියනවා.
2. Virtual Template Interface Configure කිරීම
දැන් PPPoE Client එක connect වුනම භාවිතා කරන Interface එක configure කරමු.
Server(config)# interface Virtual-Template1
Server(config-if)# ip address 192.168.12.2 255.255.255.0
Server(config-if)# mtu 1492
Server(config-if)# peer default ip address pool CLIENT
Server(config-if)# ppp authentication chap callin
3. IP Pool එක Create කිරීම
Server(config)# ip local pool CLIENT 192.168.12.1Whenever the client connects, it will receive IP address 192.168.12.1. You can also use DHCP if you want some more options.
4. Username සහ Password Create කිරීම
Server(config)#username CUSTOMER password CISCO5. Physical Interface එකේ PPPoE Enable කිරීම
Server(config)# interface Ethernet0/0
Server(config-if)# pppoe enable group global
දැන් Cisco Router එක PPPoE Server එකක් ලෙස සූදානම්.
Step 02 - FortiGate Firewall PPPoE Client Configuration
Configure the PPPoE options from the CLI to be able to see the PPPoE options from the GUI. Starting FortiOS v7.4.7 and above PPPoE option is available on GUI by default. Also, configuration will be retained in case addressing mode is set to other modes then back to PPPoE.
1. PPPoE Enable කිරීම
From CLI:
config sys interface
    (interface)edit port1
    (port6)set mode pppoe
(port1)end
2. Network Interfaces වෙත යන්න
FortiGate Web GUI එකට Login වී පහත Path එකට යන්න.
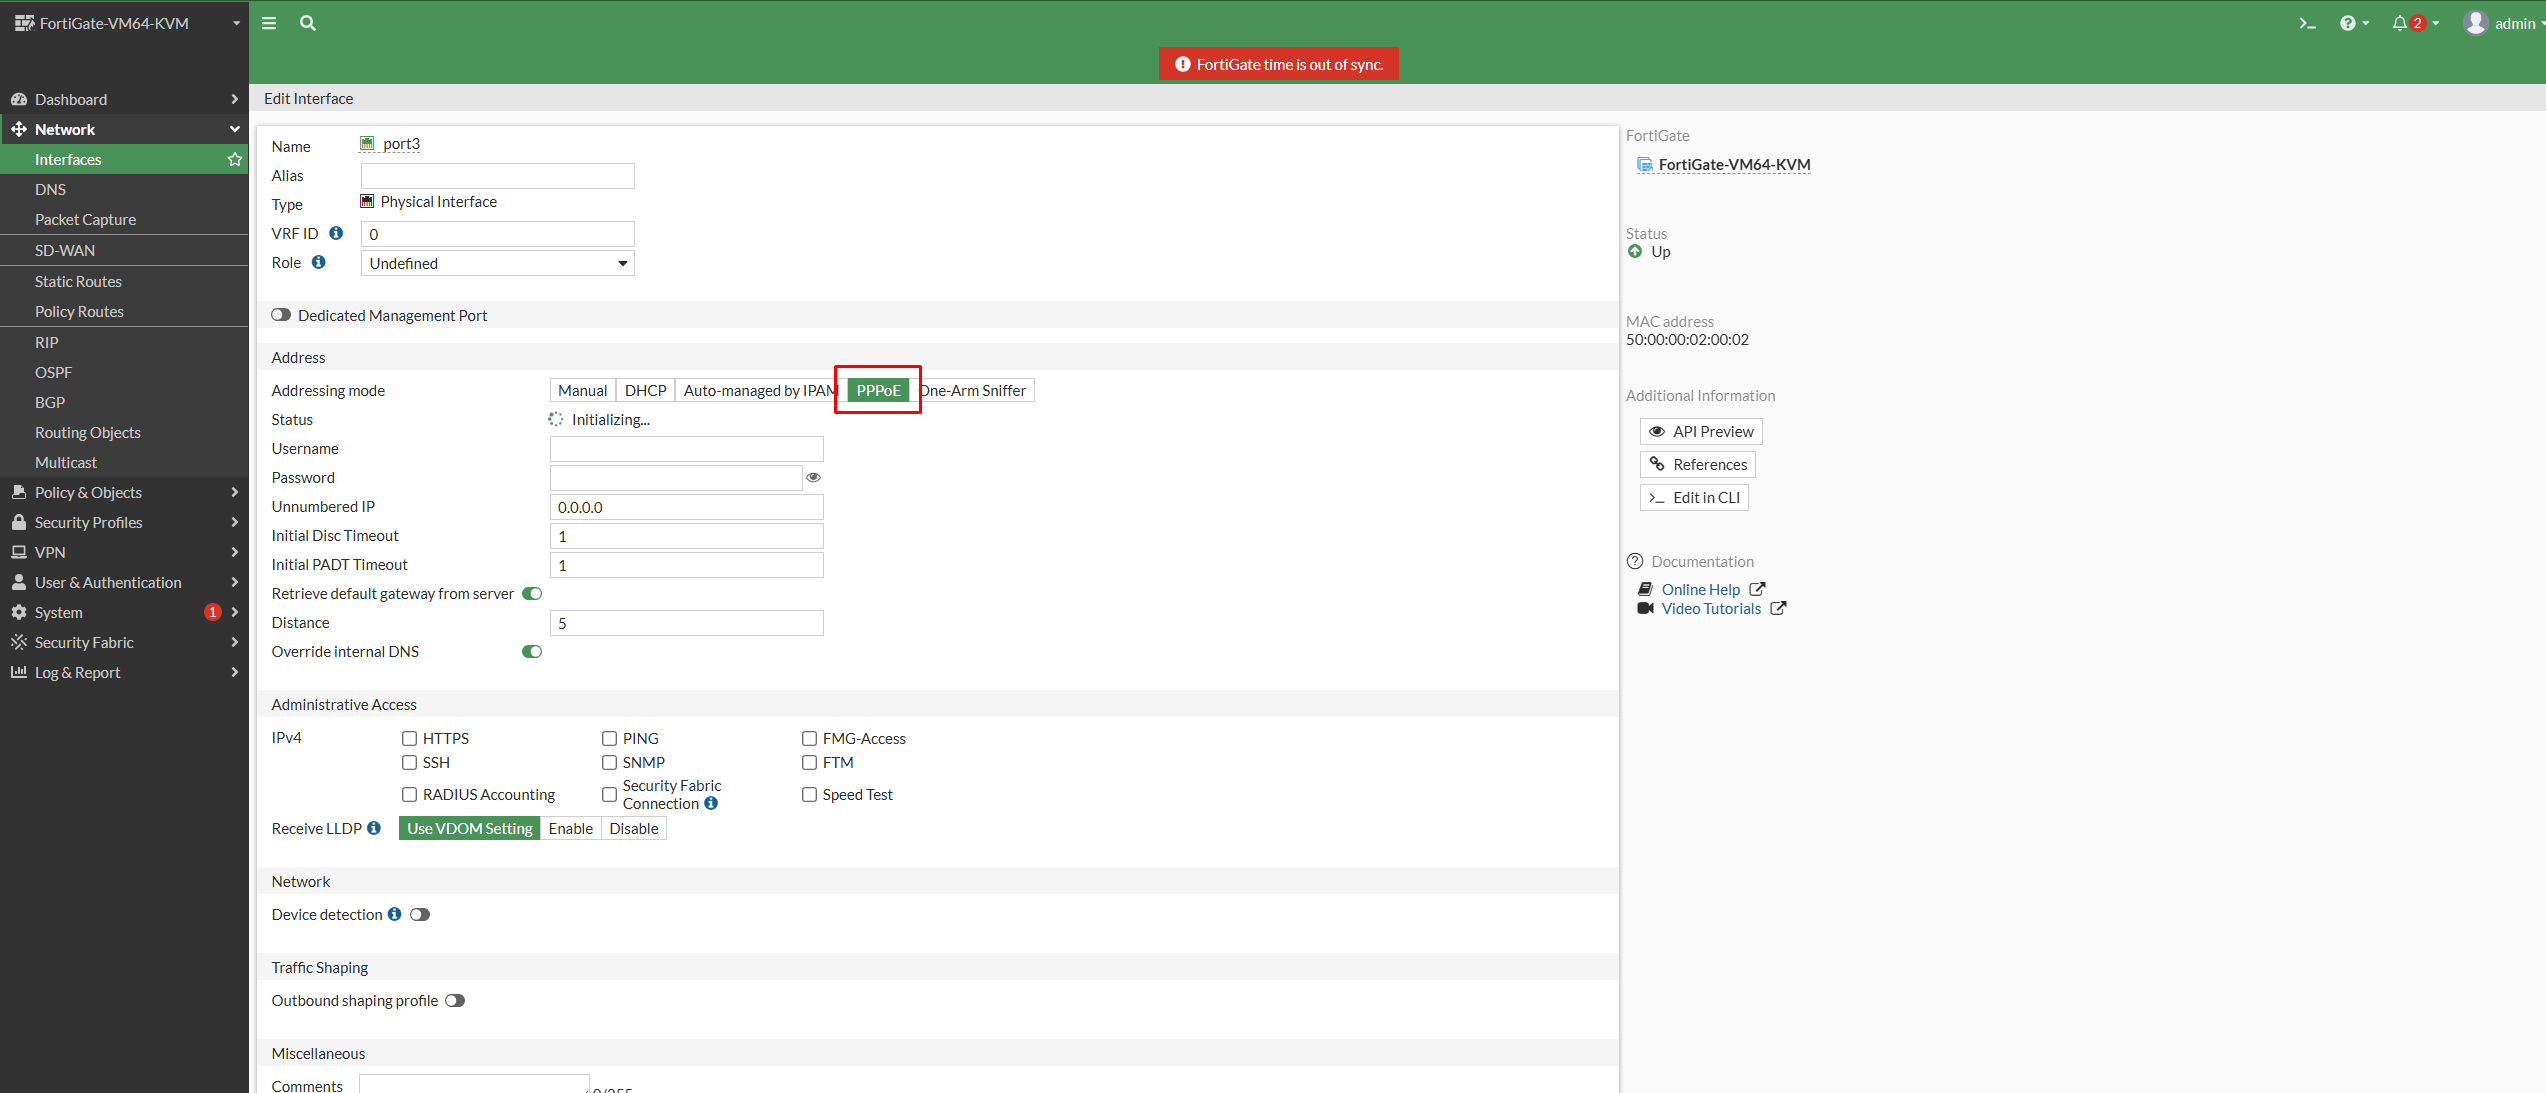
Network → Interfaces
- (port1) Interface එක Edit කරන්න
- Addressing Mode ලෙස PPPoE තෝරන්න
3. Username සහ Password ඇතුළත් කරන්න
PPPoE Authentication සඳහා Username සහ Password ඇතුළත් කරන්න. 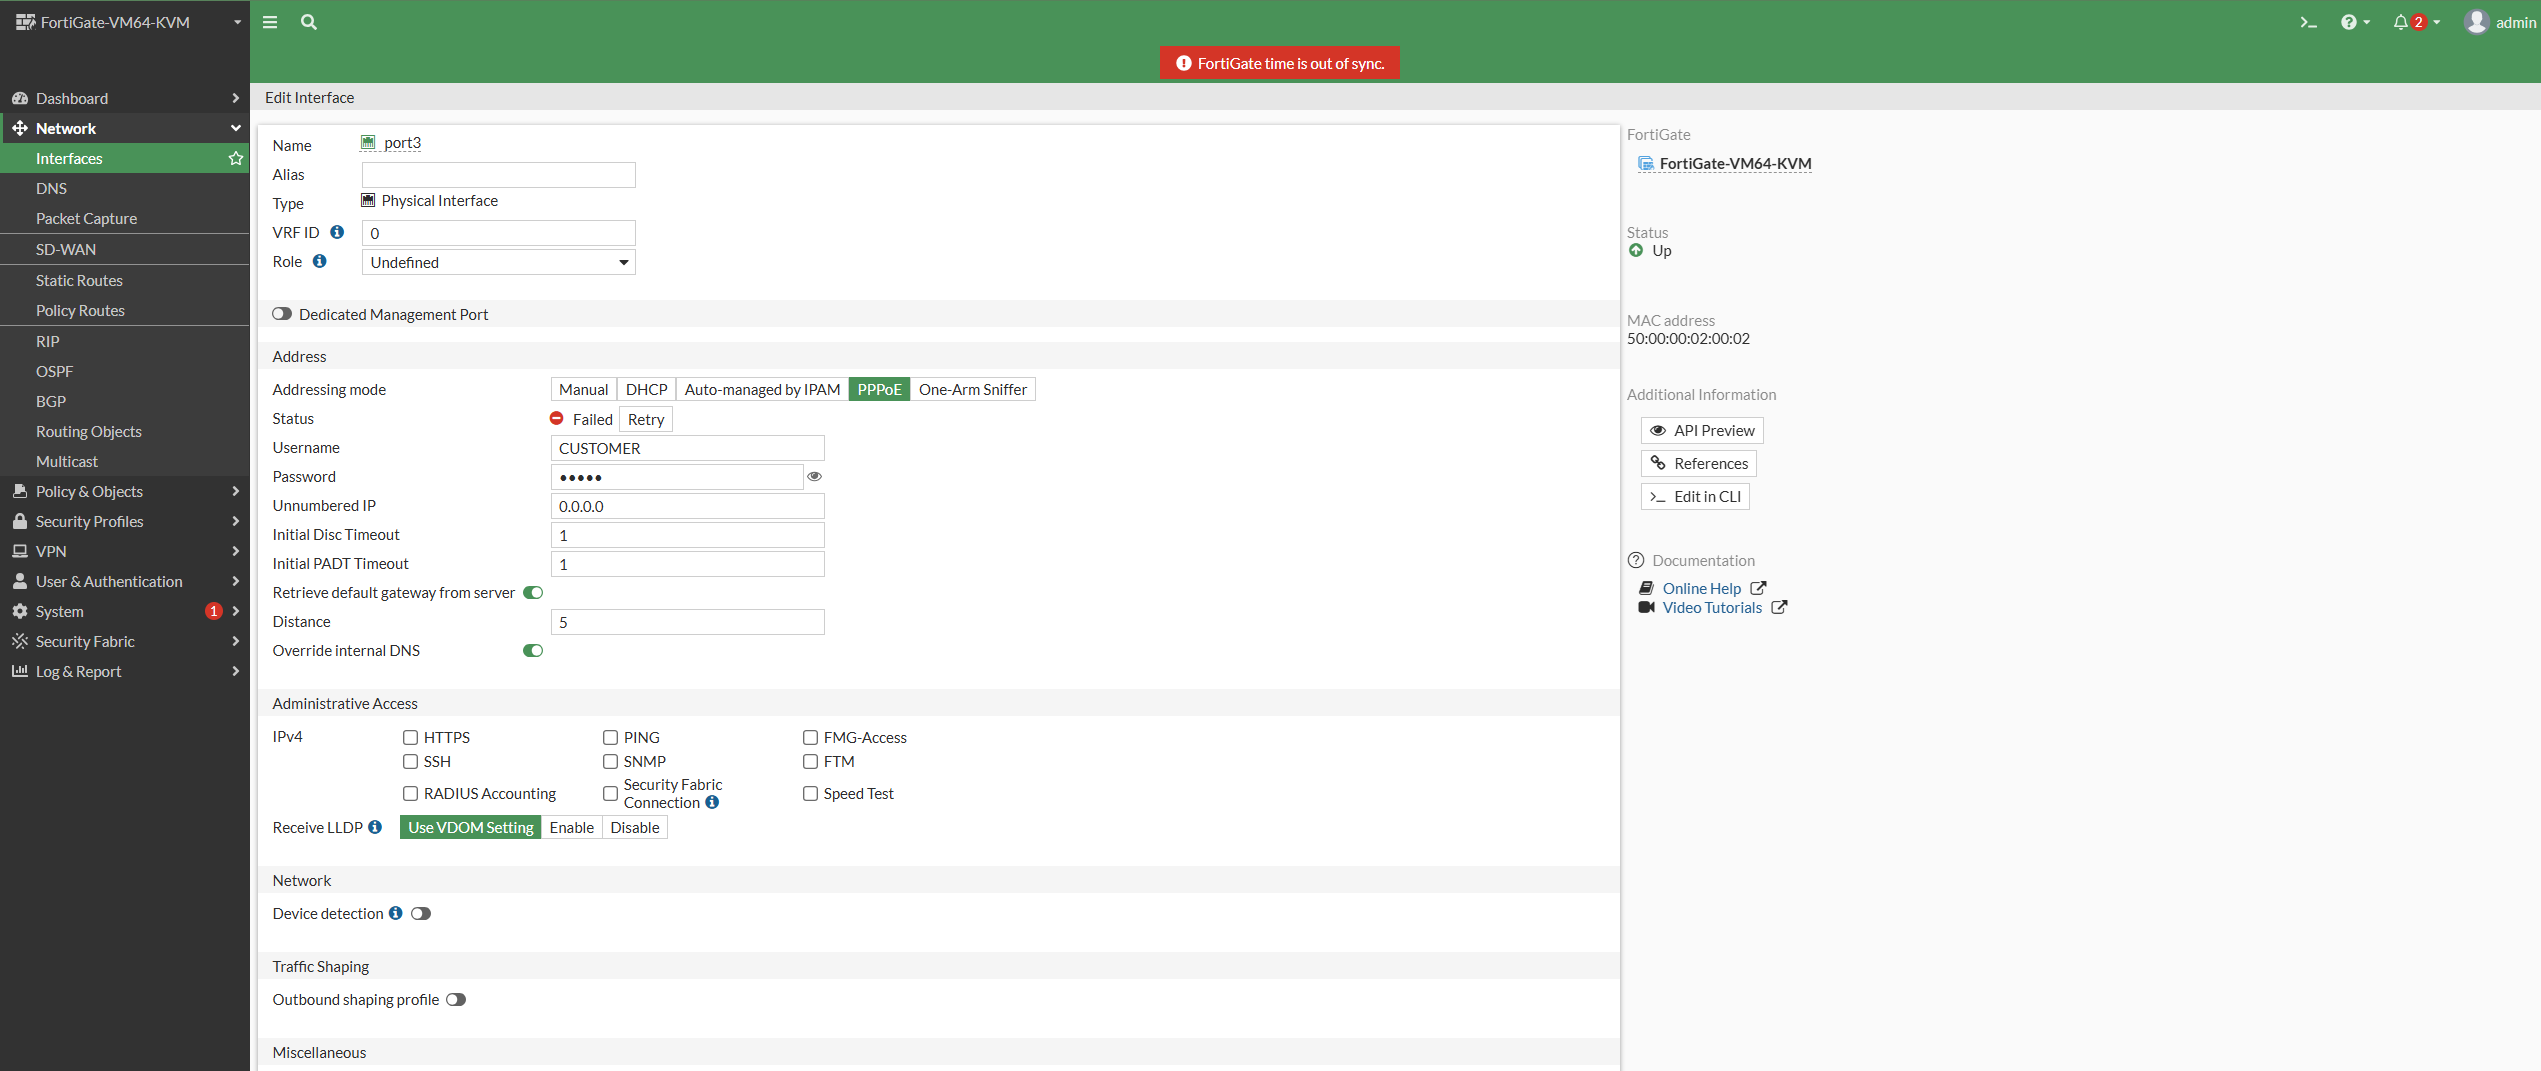
4. PPPoE Connection Verify කිරීම
onfiguration සාර්ථක නම්,
Network → Interfaces යන්න.
port1 Interface එකේ පහත තොරතුරු පෙනිය යුතුය 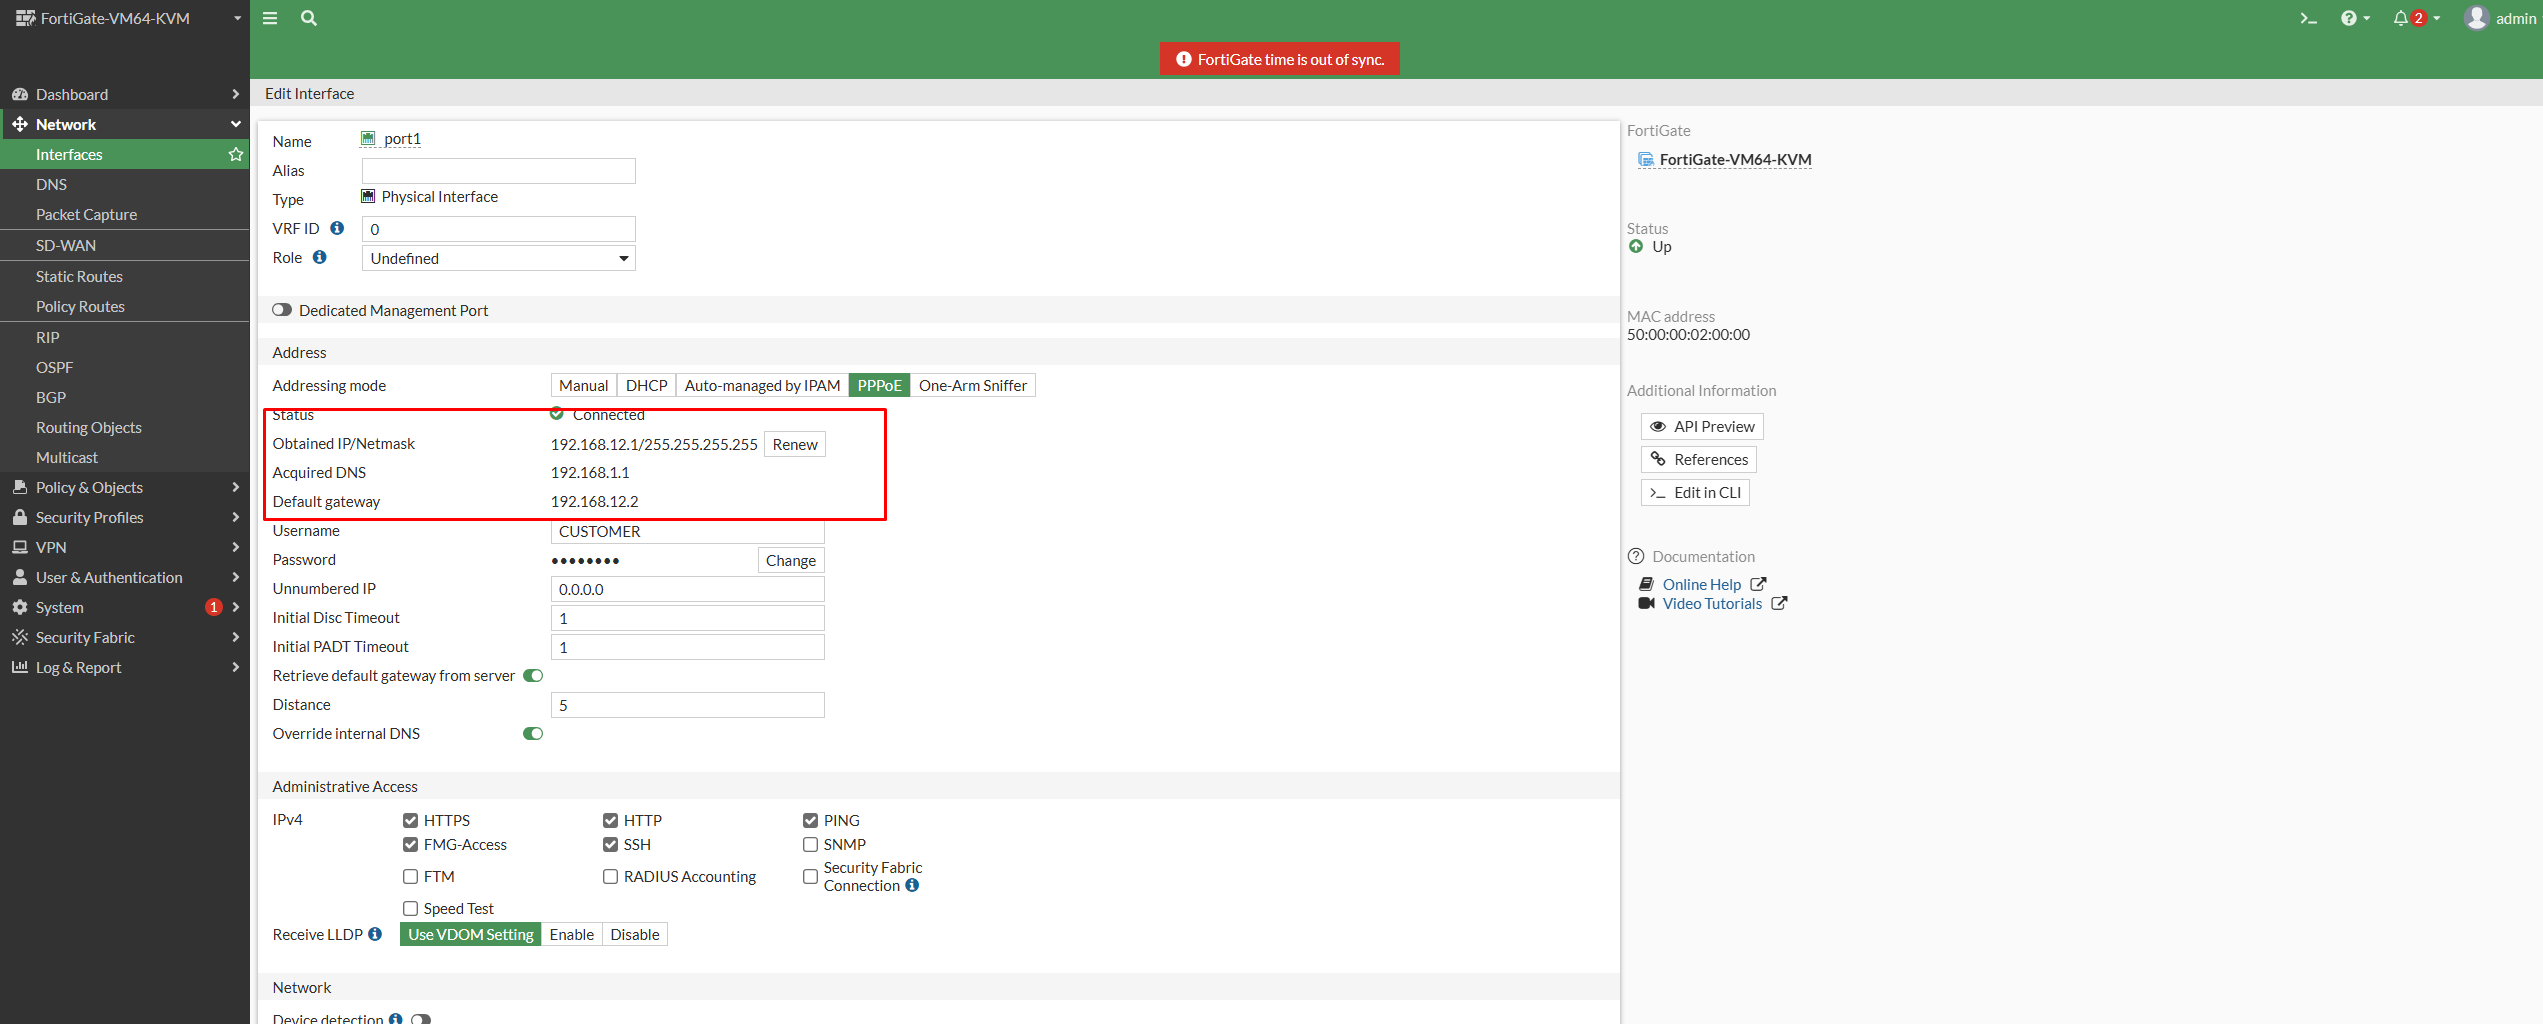
PPPoE යනු ISP ආයතන විසින් Fiber Broadband Internet සේවාවන් සඳහා බහුලව භාවිතා කරන විශ්වාසදායක Authentication Protocol එකකි. සාමාන්යයෙන් ISP විසින් ලබාදෙන ONT හෝ Router එක PPPoE Client එක ලෙස ක්රියා කළද, Enterprise සහ Business Networks වලදී FortiGate Firewall එකම PPPoE Client එක ලෙස Configure කිරීම වඩාත් සුදුසු අවස්ථා තිබේ.
මෙම ලිපියෙන් අපි Cisco Router එකක් PPPoE Server එකක් ලෙසත්, FortiGate Firewall එකේ WAN (port1) Interface එක PPPoE Client එකක් ලෙසත් Configure කරන ආකාරය පියවරෙන් පියවර ඉගෙන ගත්තෙමු.
මෙම Configuration එක හොඳින් අවබෝධ කර ගැනීමෙන් ISP Broadband Connections, Lab Environments සහ Enterprise Network Deployments වලදී FortiGate Firewall එක විශ්වාසයෙන් Deploy කිරීමට ඔබට හැකි වේ.
OneAccess Network & Cyber Academy
FortiGate, Cisco, MikroTik, Networking, Cyber Security සහ Cloud Technologies පිළිබඳ Practical Training සඳහා අප සමඟ එකතු වන්න.
Validate the PPPoE connection before moving on
After saving the WAN interface, confirm that the interface has received an address from the ISP. In the FortiGate GUI, review the interface status, its assigned IP address and the default route. A successful PPPoE login alone does not guarantee that users can browse: the firewall still needs a route to the internet, an appropriate outbound policy and working DNS resolution.
For a repeatable handover, test in this order:
- Confirm the PPPoE interface is up and has an address.
- Check that the default route uses the PPPoE WAN interface.
- Verify the LAN-to-WAN policy permits the intended users and includes NAT where required.
- Ping a public IP address from the FortiGate. If this works but names fail, test the configured DNS servers.
- Test a client device and review Forward Traffic logs to confirm which policy handled the session.
Common PPPoE problems and what to check
Authentication fails or the interface stays down
Re-check the username and password supplied by the ISP, including any required suffix. Confirm that the ONT or upstream router is in bridge mode when the FortiGate is expected to authenticate directly. Some providers require a specific VLAN on the WAN handoff; confirm that value with the provider rather than guessing.
PPPoE is connected but users have no internet
This is usually a policy, route, NAT or DNS issue. Start with the route table and the LAN-to-WAN policy. Then use traffic logs and a controlled ping test from the FortiGate. Avoid disabling security profiles just to make a test pass; identify the exact policy or profile event instead.
The connection drops intermittently
Check interface errors, physical cabling, ISP service events and WAN logs. Record the time of each dropout and compare it to PPPoE negotiation messages. That evidence is much more useful to an ISP escalation than a generic “internet is down” report.
Operational notes for production firewalls
Document the WAN interface name, VLAN ID, provider contact path, approved DNS servers and the change date. Back up the configuration before and after a production change. If this circuit is business-critical, consider a second WAN path and test failover with a controlled maintenance window. PPPoE configuration is a small task, but a clean validation and rollback plan is what makes it safe in an enterprise environment.
Get the next practical update from OneAccess
We'll send focused training, certification, and enterprise IT updates connected to this article. Your details are sent to our CRM follow-up workflow and saved in the local lead queue.